How to Use img2img in Stable Diffusion (A1111)

Table of Contents
1. Introduction
In today's digital landscape, the ability to create striking artwork from simple images can be an empowering skill for artists, designers, and hobbyists alike. One powerful tool that has gained momentum in the realm of AI art generation is Stable Diffusion. Among its various features, the img2img functionality stands out as it enables users to transform ordinary images into extraordinary art pieces seamlessly. This blog post serves as a comprehensive step-by-step guide on how to utilize the img2img feature in Stable Diffusion, turning your creative visions into reality.
2. Requirements and Downloads
Before diving into the magic of img2img, it’s essential to ensure that you have everything you need for a smooth experience. Below is a checklist of requirements:
-
A computer or laptop equipped with a dedicated GPU (at least 4GB of VRAM is recommended)
-
Minimum 8GB of RAM
-
The Stable Diffusion software—installation guides are readily available online
-
A suitable Checkpoint, which is crucial for image generation. How to install a Checkpoint?
-
A starting image (this can be your own photograph, a drawing, or any other image you find online)
Once these prerequisites are in place, you're ready to embark on your journey of transforming images into captivating AI art!
3. Settings for Stable Diffusion & Prompt Configuration
Once you have successfully installed Stable Diffusion, navigate to the img2img tab. This is where the magic begins! Start by dragging or uploading your chosen initial image. For instance, one might use a photograph of a bird captured on a smartphone.

Next, you need to select a Checkpoint, also known as a model. For diverse and stunning outputs, using the revAnimated model is recommended, especially for those interested in fantasy or anime styles.
To enhance your creation, you’ll need to write an effective prompt. The prompt should closely describe the image you’ve uploaded. You can also consider using tools like “Interrogate CLIP” to help generate a description, although the accuracy may vary.

You may notice at the end of my prompt I wrote "<lora:LowRA:0.3>", this is a LoRA you can learn more about how to use this in our LoRA Guide.
4. Navigating Image-to-Image Settings
Once you have written up your prompts it is time to play with the settings. Here is what you need to know:
-
Sampling Method: The method Stable Diffusion uses to generate your image, this has a high impact on the outcome of your image. I used DPM++ 2M SDE Karras, the step sizes Stable Diffusion uses to generate an image get smaller near the end using the Karras sampler, this improves the quality of images. You can use any sampler but for the revAnimated model i recommend DPM++ 2M SDE Karras or DPM++ 2M Karras
-
Sampling Steps: The number of sampling steps in Stable Diffusion determines the iterations required to transform random noise into a recognizable image based on the text prompt. Generally, higher sampling steps enhance image detail at the expense of longer processing time. Remember, it's a trade-off between detail and processing time.
-
Resize to: Here set your Width and Height of the generated image, most models are trained on a 512x512 or a 512x768 resolution using those resolutions result in a better image. However you are free to change this, I recommend a maximum resolution of 768x768 for a square image.
-
CFG Scale: How strongly the image should conform to the prompt - lower values produce more creative results, i recommend a balanced setting of around 7,5.
-
Denoising strength: Determines how little respect the Stable Diffusion algorithm should have for the image's content. At 0, nothing will change, and at 1 you'll get an unrelated image. With values below 1.0, processing will take less steps than the Sampling Steps slider specifies. I used a value of 0,65 for this example
-
Seed: A value that determines the output of a random number generator - if you create an image with the same parameters and seed as another image, you'll get the same result.
-
Batch count: How many images to create (this has no impact on generation performance or VRAM usage). I used a batch count of 4 to generate 4 different images.

5. Generating Your Artwork
With all your settings in place, you are now ready to generate your artwork! Simply press the "Generate" button, and watch as Stable Diffusion transforms your starting image into a new visual creation.
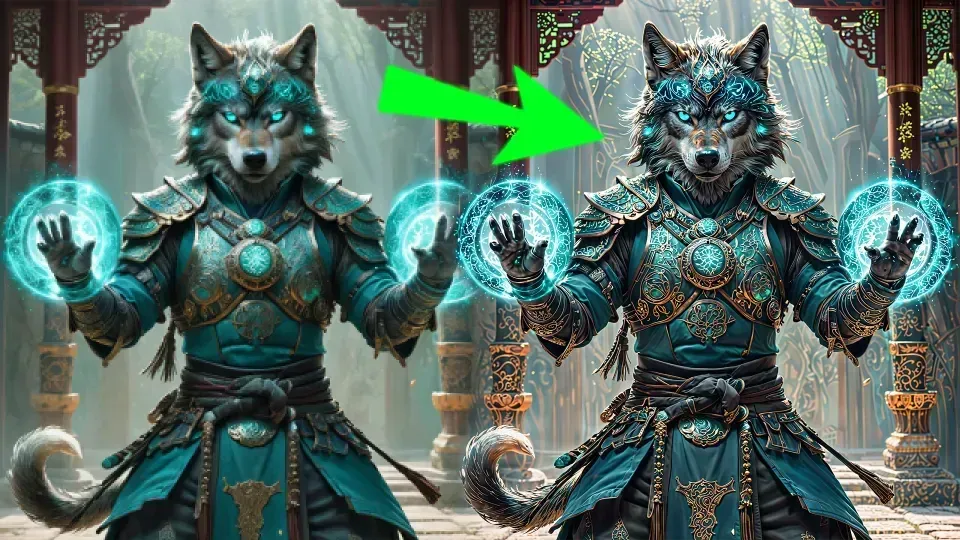
Here is my before and after with the settings I used in Stable Diffusion with the img2img function.
Starting Picture:
 Results:

 The outputs are saved by default in the outputs folder followed by what type of generation you used and the date the image was created, in this example the output folder can be found here: Stable-diffusion-webui\outputs\img2img-images\2025-28-01
6. Conclusion
In conclusion, Stable Diffusion and its img2img feature provide a remarkable avenue for unleashing one’s artistic potential. By following this step-by-step guide, you can transform ordinary images into extraordinary pieces of art, enhancing visual storytelling and artistic expression. Remember that experimentation is key—don’t hesitate to adjust settings, try different prompts, and most importantly, have fun with the process! Embrace the wonders of AI in your creative journey and let your imagination flourish.